Pythonで簡単にアプリを作ることができる「tkinter」についてインストールから実用例までを複数章に分けて解説していく。(2020年12月10日 更新)
目次
1. tkinterのインストール
2. 基本的な構文
3. ラベル
4. ボタン
5. エントリー
6. テキスト
7. スクロールバー
8. チェックボックス
9. アプリへのバインドについて
10. 複数のアプリ画面をつくる
11. 作ったUIを消す(デストロイについて)
2. 基本的な構文
3. ラベル
4. ボタン
5. エントリー
6. テキスト
8. チェックボックス
9. アプリへのバインドについて
10. 複数のアプリ画面をつくる
11. 作ったUIを消す(デストロイについて)
スクロールバー
スクロールバーの作成にはまず
scroll_X = t.Scrollbar( orient = 'horizontal' )
scroll_Y = t.Scrollbar( orient = 'vertical' )
続いてエントリーやテキストにスクロールバーを紐づける。
ent = t.Entry( xscrollcommand = scroll_X.set )
ent = t.Entry()
ent[ 'xscrollcommand' ] = scroll_X.set
tex = t.Text( yscrollcommand = scroll_Y.set )
tex = t.Text()
tex[ 'yscrollcommand' ] = scroll_Y.set
次にスクロールバーをエントリーやテキストの横軸または縦軸に紐づける。
scroll_X[ 'command' ] = ent.xview
scroll_Y[ 'command' ] = tex.yview
縦軸のスクロースバーを設置したテキストに、20行の数列を打ち込むプログラムを記載する。右端のスクロースバーをいじることにより下まで読むことができる。
実行例
実行結果(gif画像)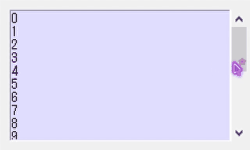
import tkinter as t
app = t.Tk()
app.title( 'テスト' )
app.geometry( '250x150' )
scroll_Y = t.Scrollbar( orient = 'vertical' )
tex = t.Text( background = '#DFDFFF', yscrollcommand = scroll_Y.set)
tex.place( x = 10, y = 10, width = 220, height = 130 )
scroll_Y[ 'command' ] = tex.yview
scroll_Y.place( x = 230, y = 10, height = 130 )
#0~19までの数字を1行ごとに挿入している
s = [ tex.insert( t.END, str(x) + '\n' ) for x in range(20) ]
app = t.Tk()
app.title( 'テスト' )
app.geometry( '250x150' )
tex = t.Text( background = '#DFDFFF', yscrollcommand = scroll_Y.set)
tex.place( x = 10, y = 10, width = 220, height = 130 )
scroll_Y[ 'command' ] = tex.yview
scroll_Y.place( x = 230, y = 10, height = 130 )
s = [ tex.insert( t.END, str(x) + '\n' ) for x in range(20) ]
実行結果(gif画像)